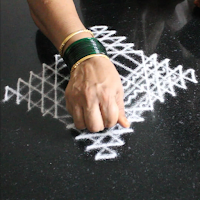
This kolam is a bit tricky, hence I have added more images. Observe the images carefully, particularly for connecting the lines on four sides of the square.
Add neli lines ( neli literally means wriggle, they are twisted lines usually drawn in pairs particularly for traditional rangoli).
Add lamp designs on four sides of the kolam , place
deepams . Decorate with kavi . A
simple beautiful rangoli using lines
Rangoli tip - I use white kola podi and rice flour in the ratio 3:1 i.e. 3 parts kola podi and one part rice flour.
I sieve the kolam powder before mixing both thoroughly.
I have given many steps for the first kolam. I think you may like the 2nd kolam design drawn using 7 dot grids.
The third design is also beautiful and tricky too. I have not added the steps. Please try and let me know how it went.
One of the most awesome traditional lines rangoli kolam designs
Another step for this kolam with lines and angles
You can try this for Bhogi geethala muggulu
Green glass
bangles with gold bangles , my trade mark :)
The rangoli shown through the pics above may appear simple but there are some tricks that are necessary to get the best possible shape. First the square must be as perfect as possible with the sides at right angles to each other.
Once this is done the lines of decreasing lengths can be drawn on all four sides. In this also an important parameter is to be taken into account. The lines on all four sides should be of the same length i.e. the first line drawn parallel to the square should be of the same length as other lines drawn on the remaining three sides. Similarly for the other lines of decreasing length.
If this is achieved the inclined lines will connect perfectly and will be parallel to one another. If we feel that the straight lines are not of equal length, we should extend a little while drawing the inclined lines.
In the final image above, you may observe that near perfect geometry has been achieved. This is possible by following the above tips.
The dot pattern used for the design shown above is 7 dots 3 rows and 3 dots 2 rows (on either side).
With such a small and compact dot grid we can represents lamps, flowerpots and ground chakra as shown in the picture above.
The beauty of the rangoli gets enhanced when we use thin lines for small kolam. One of the viewers asked me that there are simple methods for creating rangoli kolam using tools. Why struggle like this :)
I replied traditional rangoli that too drawn with thin lines is a beautiful art. For me it gives peace and satisfaction that we get in meditation.
The next image will show the effect of drawing thin ezhai. Ezhai is very thin so using an adjective thin to qualify is superfluous. However, I have used it for those who do not know Tamil and also to emphasise it.
The effect of thin lines is more pronounced in the kolam picture shown above. Purists of the art insist that any kolam should be drawn with minimum two lines. I have tried it with two lines drawn one after the other.
My sister who herself is an expert in kolam drawing and incidentally who taught me along with my mother (when I was young) was amazed to see this pattern. She appreciated me and that is straight from the horse's mouth.
From this collection you can choose one Karthigai Deepam easy kolam for decoration, some of them can be drawn easily, I believe.


Comments