This post may answer the queries - how to draw rangoli step by step, how to draw rangoli with dots. These are interlaced dots i.e the current row of dots is placed between the previous rows. Mark this post for New Year rangoli or
Deepavali rangoli designs.
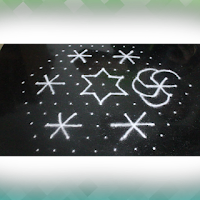
Some information about the first rangoli. It must be attractive to see but it may be difficult to master for some of us.
What is otherwise a very simple chukki rangoli design for Sankranti one may face problems in ensuring that all the pumpkin (poosanikkai in Tamil) patterns drawn around the central star design just touch each other.
All of them should just touch each other. In some or all of them we may face the problem of leaving a gap or overlapping/intersecting (like a Venn diagram).
The main criterion to avoid them is to have dot grid placed perfectly with equal gaps among the dots.
Draw the floral (sometimes called pumpkin patterns in Tamil) starting from one side i.e. draw the first one as shown in the image below and then draw the ones above and below it. This may also help.
The second rangoli is one of the easiest and simplest chukki rangoli as you can see probably except for the central pattern.
13 dots kolam | 13 dots rangoli | 13-7 dots rangoli | 13 chukkala muggulu
,,
 |
Chukki rangoli step by step pic 1
|
Connect the dots to get curved lines without a break. This is the important tip in this rangoli
 |
chukki rangoli step by step image 2
|
Colourful lines are better than filling completely for this kolam because if we fill up the rangoli completely it may obscure the beauty
Rangoli tips - We should decide whether to add minimum colours or fill completely depending upon the design. If there are already some patterns inside the white rangoli part to be filled, in this case white lines representing pumpkins, it is better to draw lines. One more method of enhancing the beauty of rangoli is by not obfuscating the original design which makes our work of colouring easy, doesn't it!
This is one of the most
awesome rangoli designs you can draw for Diwali
 |
chukki rangoli for competition with colour
|
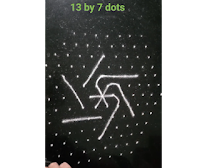
The next 13 dots design you can use for Sankranthi rangoli designs
 |
| chukki rangoli step by step picture 1 |
Connecting outer dots two samples shown
 |
| rangoli with chukki steps |
Again, with very few colours you get a beautiful rangoli for Dasara
 |
| Simple chukki rangoli with colour |
Two rangoli designs shown through images step by step.
The more you observe your elders drawing kolam, the easier it is to learn. This is my experience. When I draw for my videos, my daughter observes me occasionally as she is busy with her own avocation during holidays. I asked to draw a rangoli on the surface I draw for my video shoots. She took the kolapodi and drew a beautiful design in a jiffy. The lines were beautiful and thin.
I asked her to try a double line kolam. Immediately she drew
parallel lines quite easily. We should remember that children always observe us. They learn both positive and negative things from us. So, we have to be careful.
On a lighter side, my husband who shoots the videos for the past ten years, tried a rangoli a couple of times. He could not manage even one line. He gave up and said, "I will restrict myself to shooting videos henceforth."
Bookmark this post since we can also use this for
new year rangoli designs chukki rangoli and also for chukki rangol bisuvudu


Comments